Spazzie’s Miniturization Continues!
Last night, I did some good progress on Spazzie – I completed two of the three things I have left to do with him before I can start finalizing his circuitry and getting a real idea of how I can lay it all out on a PCB instead of the bulky breadboard.
Can you tell what is new on him?
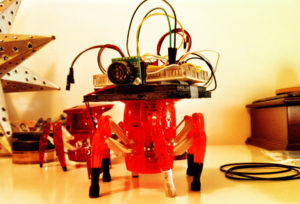
Most noticeably, he has a new sensor! The old Sharp IR Rangefinder has been replaced with a shiny new MaxBotix EZ1 Ultrasonic sensor, meaning he now has BAT LIKE VISION! Hehe, well not exactly. But it is still awesome, and gives both more accurate measurements and a sweet cyclops look! Less noticeably, he now has dual power supplies, one dedicated to the motors (I used the 1xAA to 5V Step up) and the LiPo powering the Arduino, motor driver logic, LED, Piezo, and MaxBotix sensor. This seems to have taken care of the issues with power I was having, and although it adds a little bit of weight, I placed everything in such a way that the center of gravity is still in the center, so it is still moving more smoothly than with the old form.
I am also psyched that I finally figured out how to wire up the 1A Dual TB6612FNG Motor Driver with two power supplies. It didn’t even burst into flames or anything! Finally I learned how to read the schematic and the way the breakout board was wired made sense. It was actually a great learning experience, and I have to thank everyone that bothered looking at it with me, including my dad, and my buddy Ted from TomorrowLab. I am going to update my post on the driver to have what I currently believe to be the proper way to wire it.
Long story short?
PGND != GND
PGND = Power Ground (Motor Power)
GND = Logic Ground (Chip Power)
So now the task that looms on the horizon is hooking it up to my joystick with XBee so I can control it. I actually feel pretty confident about it because I recently got an unexciting but rather important benchmark out of the way – setting up an experiment with 2 xbees (Series 1) and 2 Arduinos, where one is the transmitter and the other is the receiver. If anyone is interested in this, I would gladly post something on it. I know had a tough time finding simple instructions on it.
Next steps:
0) Test dual power supplies!
1) Implement New Rangefinder!
2) Add XBee control! Update! XBee control achieved! Read Post
Comments